
What's inside
As an Amazon Associate I earn from qualifying purchases. This post may contain affiliate links at no extra cost to you.
The short answer: the best handheld electric planers are the ones that match the work in front of you, whether that is trimming a sticking door, smoothing a rough board edge or knocking down a high spot on a beam. For most home workshops, a corded planer with a well-marked depth dial, a reasonable cutting width and a good dust port is the dependable choice. A cordless planer is attractive if you already own the batteries and work away from outlets. Whichever you choose, the blades, the shoe and the safety habits matter more than any headline feature.
This article does not rank individual products. It walks through how these planers cut, which parts decide the quality of the finish, how corded and cordless options compare, and what to inspect before and after you buy. Keep the manufacturer’s manual in mind as the final authority and check current specifications on every listing.
Our Top Picks
 Makita XPK01Z 18V LXT Lithium-Ion Cordless 3-1/4-Inch PlanerOne Size14 x 9 x 8 inches7.2 PoundsCheck on Amazon
 FOXBC 13-Inch Planer Blades Replacement for DeWalt DW73513 x 0.9 x 0.1 inches0.6 poundsCheck on Amazon
 G & F Products Two-Strap Disposable Dust Masks1 Count (Pack of 50)4 x 12 x 5 Inches0 poundsCheck on Amazon

Contents
- What a handheld electric planer does
- When a planer is the right tool
- The parts that decide the finish
- Corded or cordless?
- Blades and maintenance
- Comparison table: planer types
- Technique basics for cleaner results
- Safety notes
- Buyer checklist
- Mistakes to avoid
- Frequently asked questions
- Bottom line
What a handheld electric planer does
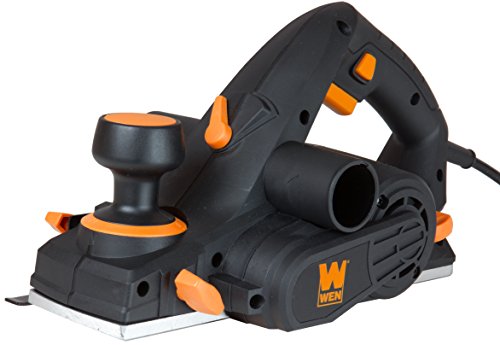
A handheld electric planer is essentially a motorized version of the traditional hand plane. A cutterhead, a rotating cylinder fitted with sharp blades, spins rapidly beneath the tool, between a front shoe and a rear shoe. You push the planer along a surface, and the blades shave away a thin layer of wood with each pass. The front shoe is adjustable, and that adjustment controls how deep the cut is. When the front shoe sits level with the rear shoe, the planer removes almost nothing. Lower the front shoe and the blades protrude farther and the cut gets deeper.
Chips are thrown out of a port on one side, usually the right, and can be directed into a bag or a vacuum hose. Because the cutterhead spins at high speed, the surface left behind is often smoother than a pass with a coarse hand plane, provided the blades are sharp and your technique is steady.
It helps to understand what this tool is not. It is not a thickness planer, which feeds a board through a stationary machine to produce parallel faces at a set thickness. It is also not a jointer, which flattens a face or squares an edge on a stationary bed. A handheld planer is a portable problem solver: quick material removal on stock that is already in place or too awkward to carry to a machine.
When a planer is the right tool
Doors and frames
The classic use is trimming a door that rubs against the jamb or drags on the floor. Removing a small amount of wood from the edge, with the door on a pair of supports, is much faster with a power planer than with sandpaper or a block plane.
Board edges and rough lumber
For smoothing saw marks, easing a bowed edge or dressing the sides of rough-sawn boards, a planer can speed up the first stage of the job. It will not make a board perfectly straight on its own, but it is useful for bringing an edge close to final shape before you finish with other tools.
The parts that decide the finish
Depth adjustment
Look for a depth knob with clear, easy-to-read markings and a smooth feel. Fine adjustment matters because you often want to remove only a hair of material. A knob that is imprecise or stiff makes it hard to creep up on a fit. Some tools have positive stops or detents; others use a continuous dial.
Cutting width
The cutterhead width limits how much of a surface you can plane in one pass. Wider heads cover more area and give a flatter result on broad faces, but they also require more power and make the tool heavier. A narrower head is easier to control on edges and tight spaces. For doors and edge trimming, a modest width is usually enough. For wide boards and beams, a wider cut saves effort.
Shoes and base
The planer’s flat base, formed by the front and rear shoes, is what guides the cut. A base that is flat, rigid and well finished tends to produce a more consistent surface. Metal shoes are common on better tools, while light plastic parts may flex or wear.
Fence and guides
A side fence helps you keep the planer square to an edge or hold a set bevel angle. A fence that is flimsy or flexes under pressure defeats its purpose, so look for one that locks securely. If you plan to bevel edges often, favor a model whose fence adjusts smoothly and shows its angle clearly.
Dust and chip collection
Planers produce a lot of chips very quickly. A collection bag catches some of them, but a port that fits a shop vacuum hose captures far more and keeps your work area cleaner and your breathing safer.
Corded or cordless?
Corded planers
A corded planer delivers consistent power for as long as you need it. That matters because planing hardwood or removing a lot of material puts a steady load on the motor. Corded models are usually less expensive than cordless alternatives, and they have no battery to charge or replace. The downside is the cord, which can snag on the workpiece or get in the way when you swing the tool through a pass.
Cordless planers
Cordless planers are convenient for site work, door trimming in occupied rooms and any location without a handy outlet. If you own batteries and a charger from a compatible system, buying a bare tool can be economical. Runtime depends on battery capacity, wood species and cut depth. Softwoods and shallow passes are easy on a battery; deep cuts in dense hardwood drain it quickly. Check whether the tool uses a brushless motor and what the manufacturer states about its intended use, and do not assume a cordless planer will match a corded one for heavy removal.
How to decide
If you plane regularly or work with dense wood, lean corded. If you mostly trim doors, fit trim and make light passes, cordless convenience may be worth the premium. You can compare corded electric planers and cordless electric planers side by side to see how the feature sets differ.
Blades and maintenance
Blades are the heart of a planer. Dull blades tear grain, leave ridges and make the motor work harder. Most planers use small reversible blades, often made of carbide, that can be flipped when one edge wears out and replaced when both edges are tired. Others use straight steel blades that can be sharpened. Check which blade type a given model uses, and look at how easy the replacement process is.
Blade alignment is equally important. The blades must sit level with the rear shoe at zero depth. If one sticks out farther than the other, the planer leaves grooves or a stepped surface. Many models include a setting gauge or reference tool; if yours does, learn to use it.
Keep spare blades on hand so a nick does not stop a project. Check your tool’s manual to confirm the correct blade type before buying a replacement planer blade set, because sizes and mounting styles vary between models.
Nails, screws and grit are the enemies of blades. Reclaimed lumber and old doors may hide fasteners or embedded dirt. Inspect and, if necessary, use a metal detector or carefully check the surface before planing. A single nail strike can chip a carbide edge.
Comparison table: planer types
This table compares general categories and their typical traits. Confirm the details of any specific model on its listing, since features differ widely.
| Type | Best for | Strengths | Watch-outs |
|---|---|---|---|
| Corded handheld planer | Frequent use, dense wood, heavier material removal | Steady power, usually lower cost, no battery to manage | Cord can snag, needs an outlet or extension cord |
| Cordless handheld planer | Door trimming, site work, light to moderate passes | Portable, quick setup, shares batteries with other tools | Runtime varies, deep cuts in hardwood drain batteries |
| Compact or mini planer | Small edges, trim, light chamfers | Light, one-handed in many cases, easy to control | Narrow cut, limited removal rate |
| Manual hand plane (for comparison) | Fine fitting, quiet work, small adjustments | No power needed, excellent control, very quiet | Slower, more skill and effort required |
| Benchtop thickness planer (for comparison) | Producing boards of a uniform thickness | Parallel faces, repeatable thickness | Stationary, takes space, different job entirely |
Technique basics for cleaner results
Good technique makes a mid-range planer perform better than a premium one used badly. Start by securing the workpiece firmly. A board that shifts under the planer ruins the cut and can be dangerous. Clamp it, or support a door on stable trestles with the edge to be planed facing up.
Set the depth to a shallow cut. It is better to make several light passes than one aggressive one, which risks tear-out and a rough finish. Rest the front shoe on the surface with the cutterhead lifted off the wood, then switch on the tool and let the cutterhead reach full speed before you push forward. Apply pressure on the front handle at the start of the pass, shifting it to the rear as the planer travels across the board, so that the tool does not dip at either end. This weight transfer is the secret to avoiding a rounded surface or a gouge at the finish of each pass.
Pay attention to grain direction. Planing with the grain gives a smoother result than going against it, where the blades lift and tear fibers.
Safety notes
An electric planer’s exposed cutterhead is a hazard, and wood dust is a health concern. The following habits are widely recommended, but you should read the manual for your own tool.
- Eye and ear protection: wear safety glasses and hearing protection. Chips fly out quickly and the motor is loud.
- Dust: connect a vacuum or collection bag and wear a dust mask or respirator suited to fine wood dust. Some woods can cause skin or respiratory irritation, so ventilate the workspace.
- Unplug before service: disconnect the cord or remove the battery before changing blades, adjusting parts or clearing jams.
- Let the blades stop: after you switch off, wait for the cutterhead to come to a complete stop before putting the tool down on its side, unless it has a parking foot designed for that purpose.
- Hands clear: keep both hands on the handles and out of the chip path and away from the cutterhead.
- Check for metal: remove nails, staples and screws, and be cautious around reclaimed wood.
- Secure the workpiece: never hold small pieces by hand while planing them.
- Cord management: keep the cord behind you and out of the cutting zone.
- Treated and old materials: older painted surfaces and some treated lumber can release hazardous dust. Take appropriate precautions and consult current guidance before working on them.
Check current specifications and instructions for your planer and any accessories before use.
Buyer checklist
- Define the main job: door trimming, edge dressing, chamfering, rabbeting or construction work.
- Choose corded or cordless based on how often you use it and where.
- Check the cutting width against the surfaces you plane most.
- Confirm the depth adjustment is easy to read and fine enough for small removals.
- Look at the maximum cut depth, and remember a deeper cut is not always a better tool.
- Verify the blade type, how it is changed and whether replacements are easy to find.
- Make sure there is a dust port that fits a vacuum hose, plus a bag.
- Look for a parking foot or similar feature that lifts the blades off the work surface.
- Plan your safety gear: glasses, hearing protection and a dust mask before the first cut.
Mistakes to avoid
Taking off too much in one pass
A deep cut feels efficient until the surface tears or the motor bogs down. Make shallow passes and stop to check fit.
Planing without checking for fasteners
One hidden nail can ruin a blade edge. Inspect old lumber and doors carefully before starting.
Letting the tool dip at the ends
Failing to shift pressure from the front to the rear handle leaves a rounded or scooped surface. Practice on scrap wood first.
Ignoring blade alignment
A blade that is not level with the rear shoe produces ridges. Follow the manual’s setup procedure after every blade change.
Frequently asked questions
1. Can an electric planer replace a jointer or thickness planer?
Not really. It is a portable tool for trimming and shaping. A jointer flattens and squares stock on a bed, and a thickness planer produces uniform thickness. A handheld planer is a flexible helper, not a substitute for either machine.
2. Is an electric planer good for trimming doors?
Yes, it is one of the most common applications. Remove the door if you can, work in light passes and seal the freshly cut edge afterward.
3. How deep can a handheld planer cut?
The maximum cut depth is listed in each model’s specifications, and it varies. In practice you will usually get better results using shallow passes well below that limit.
4. How often should I change the blades?
There is no fixed schedule. Replace or turn them when the surface starts to look torn, ridged or burnished, or when the motor strains more than before. Wood species, dirt and hidden metal all affect blade life.
5. Can I plane plywood or MDF?
Glue layers and composite materials dull blades faster, and the dust from MDF is fine and irritating. If you must plane them, use a good dust collection setup and a respirator, and expect to replace blades more often.
6. Why does my planer leave grooves or ridges?
The usual causes are dull or nicked blades, blades that are not level with the rear shoe, or pressure uneven along the pass. Inspect the blades, realign them following the manual and practice your weight transfer.
7. Corded or cordless: which is better for hardwood?
Corded tools sustain heavy loads more easily. Cordless planers can work on hardwood with light passes, but battery drain is faster. Check the manufacturer’s intended use.
8. Do I need a dust collector?
You do not need a large one, but you do need effective chip and dust control. A shop vacuum hose connected to the port, along with respiratory protection, is a sensible minimum. Always follow the guidance in your tool’s manual.
Bottom line
The right handheld electric planer is the one that suits your typical job, offers precise depth control, holds its blades accurately and clears chips well. Pick corded for sustained or hardwood work and cordless for convenience and light trimming, keep spare blades nearby, and treat the cutterhead and the dust with respect. Check current specifications and instructions before buying or using any model. When you are ready, browse a handheld electric planer and compare it against the checklist above, and add a dust mask or respirator to the order.
Disclosure: As an Amazon Associate, we earn from qualifying purchases. Links marked as sponsored may earn us a commission at no extra cost to you.
Related guides
More from Amazon
Programs that pair well with the guide above. Offers and eligibility are set by Amazon and may change.
A free business account with business pricing and bulk-buying tools for work, shop or home office.
Create a business accountFree shipping on eligible items, Prime Video and more. Eligible new members can start with a free trial.
Start a Prime free trialAudiobooks and podcasts to listen to on the go. Eligible new members can start with a free trial.
Try Audible freeAd-free music streaming. Eligible new subscribers can start with a free trial.
Try Music Unlimited freeAs an Amazon Associate we earn from qualifying purchases.
Write Your Review
No reviews yet. Be the first to share your experience!