Best Value Cordless Nailer for Installing Interior Door Casings
What's inside
As an Amazon Associate I earn from qualifying purchases. This post may contain affiliate links at no extra cost to you.
Quick answer
For installing interior door casings, a cordless 18-gauge brad nailer is usually the best value. It handles the common trim nails for casing, is lighter and cheaper than a cordless finish nailer, and leaves smaller holes to fill. Choose a battery platform you already own if you can. If you have no compatible batteries, compare the full kit price—not just the bare tool—against a pneumatic nailer and compressor.
For a few doors a year, a basic cordless brad nailer is generally enough. If you install trim regularly or need stronger fastening into dense jambs, a 15- or 16-gauge finish nailer may be worth the extra cost and larger holes.
As an Amazon Associate we earn from qualifying purchases at no extra cost to you.



What door casings need
Most interior casing is roughly 1/2 to 3/4 inch thick. Nails must pass through it and bite into the jamb or framing; nail length depends on the casing, the gap behind it, and what you are fastening into. A 1-1/2-inch brad is a common starting point for casing into a wood jamb, while thicker trim or fastening into framing may call for a longer nail. Check the tool’s approved nail range and avoid placing long nails where they could strike wiring or plumbing.
An 18-gauge brad leaves a relatively small hole, which is useful on painted trim. It can be less reliable than a thicker finish nail when the casing is bowed, the jamb is hard, or you need substantial holding power. No nailer makes a poor fit disappear: scribe or adjust the casing, hold it tight, and use shims where needed. Nails are for fastening, not pulling a large gap closed.
Best value choice: cordless 18-gauge brad nailer
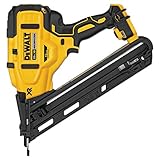
A brad nailer is the sensible buy for most homeowners casing a few doors. It is easier to handle near narrow trim and tends to leave smaller fill spots than a finish nailer. Cordless models are also convenient for moving between rooms without dragging a hose and compressor.
The trade-off is weight. Battery-powered nailers can feel nose-heavy, and some use a flywheel or gas mechanism that needs a brief recovery between shots. That is rarely a problem for occasional casing work, but it matters when working overhead or installing many doors in a day. Try the tool in hand if possible, and check whether the kit includes a battery and charger. A bare tool is only a bargain when you already own compatible batteries.
Compare current options in the cordless 18-gauge brad nailer kit category. Prices change often, so compare included battery capacity, charger, warranty, and nail range—not just the headline price.
Which type is the better buy?
| Type | Best for | Advantages | Trade-offs |
|---|---|---|---|
| Cordless 18-gauge brad nailer | Occasional casing and light trim | Small holes; no hose; often shares batteries with other tools | May be heavy; less holding power than thicker nails |
| Cordless 15- or 16-gauge finish nailer | Frequent trim work or tougher fastening | Stronger hold in many applications | Higher cost; larger holes; heavier nails can split narrow trim |
| Pneumatic brad nailer and compressor | Existing shop setup or long trim sessions | Light nailer; often economical if compressor is already owned | Hose and compressor add setup, noise, and cost if bought from scratch |
If your work is mostly door casings, a cordless finish nailer is not automatically a better investment. Buy one when you have other jobs that benefit from the extra holding strength, such as heavier baseboard or thicker trim. A pneumatic setup can undercut cordless pricing if you already have a compressor; buying both compressor and nailer for one or two doors often erases that advantage.
What to check before paying
First, confirm the nail gauge and length range. For casing, a tool that accepts common 18-gauge brads from around 1 to 2 inches gives useful flexibility, but follow the manufacturer’s limits. Second, compare kit and bare-tool pricing. If your existing battery platform has a compatible nailer, adding a bare tool can be the lowest-cost route. If not, the battery and charger may make a kit the better deal.
Look for tool-free depth adjustment, a clear jam-release process, and a dry-fire lockout that helps prevent empty shots. These are practical conveniences, not reasons to pay a large premium. A belt hook and a carry case are useful but secondary. Check replacement battery prices too: a low initial price can be less attractive if the platform’s batteries are expensive and you plan to expand your tool collection.
For a heavier-duty option, compare a cordless 16-gauge finish nailer kit. Choose by actual trim needs; do not assume a thicker nail is always safer or cleaner.
Avoid common casing problems
Test the nailer on a scrap of the same trim before working on the finished casing. Set depth so the brad sits just below the surface, not buried deep enough to crush the wood fibers. If nails protrude, increase depth gradually. If they sink too far, back off and check that the nose is held square to the surface.
Place nails near the edges carefully. A brad driven too close to the edge can split thin casing, especially near a miter. Keep a modest margin and angle opposing nails slightly when appropriate to improve grip, while avoiding the door jamb or anything hidden behind it. If the brad bends or misses the jamb, remove it rather than driving another nail into the same damaged path.
Common failure modes include short nails that only catch the casing, long nails that emerge where they should not, and nails that bend against a hard spot. Adjust length and placement on scrap, and use a hammer and nail set for any stubborn fastener. Fill small holes with a compatible filler before painting; stained trim needs a carefully matched filler because even a small patch can show.
When to buy
Seasonal promotions can make a kit attractive, but a free battery or bundled tool only has value if you will use it. Compare the sale price with the normal bare-tool price plus the battery and charger you actually need. For one room of work, borrowing or renting may cost less than buying a new platform. For recurring repairs and trim projects, a cordless brad nailer on a battery system you already own is usually the most economical balance of convenience, finish quality, and upfront cost.