Best Value Pegboard Accessories for Organizing Hand Tools
What's inside
As an Amazon Associate I earn from qualifying purchases. This post may contain affiliate links at no extra cost to you.
Pegboard accessories are inexpensive until the hooks fall out, the tool handles collide, or a crowded panel becomes hard to use. The best value usually comes from matching the accessory to the tool and the board—not buying a large assortment of every hook shape. Check your pegboard’s hole spacing and thickness first; common boards use 1-inch spacing, but hole diameter and material vary.
As an Amazon Associate we earn from qualifying purchases at no extra cost to you.


Check the board before buying
Measure the hole diameter and spacing, and note whether the panel is metal, hardboard, or plastic. Many accessories are made for 1/4-inch holes, while some pegboards use 1/8-inch holes. A hook that is too small can wobble; one that is too large may not fit at all. Also check panel thickness. Some locking clips and two-point hooks need enough room behind the board to seat properly.
For a wall-mounted panel, confirm that it is fixed to studs or a suitable backing. A pegboard accessory’s stated capacity does not make a weakly mounted board stronger. Heavy tools can pull the panel forward, especially when hung from a single-point hook.
What is worth paying for?
| Accessory | Best use | Value trade-off |
|---|---|---|
| Single or double hooks | Wrenches, pliers, tape measures | Basic steel hooks are cheap; double-point versions resist twisting better. |
| Locking hooks or retainers | Frequently handled tools or busy work areas | Cost more, but are less likely to lift out when a tool is removed. |
| Bins and cups | Fasteners, bits, small parts | Useful if they have a positive latch; shallow cups spill easily. |
| Tool holders | Screwdrivers, sockets, drills | Purpose-built holders save space, but only pay off if their spacing matches your tools. |
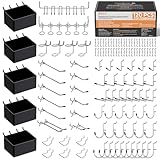
| Assortment kits | Starting a board from scratch | Good per-piece price, though many kits include shapes you may never use. |
Spend selectively on hooks and holders
For light hand tools such as small pliers, scissors, and tape measures, ordinary steel hooks are usually sufficient. A set of basic pegboard hooks is often the cheapest way to fill a new panel. Choose two-point hooks where possible: the second contact point reduces rotation when you lift off a tool. Single-point hooks can work for light items, but they are more prone to pivoting out of position.
For heavier tools or hooks you use many times a day, consider locking clips or a retaining bar. These reduce accidental pullout, but they add cost and can make rearranging the board slower. They are not automatically necessary for a home workshop where tools stay put. Avoid hanging heavy tools far out on a long hook; leverage increases the force on both the hook and the panel.
Purpose-built holders are worthwhile when they keep a group of tools together and make them easier to return. A pegboard screwdriver holder can be more convenient than a row of narrow hooks, but check the slot diameter and tool spacing. Thick handles may not fit, and a crowded holder can make the screwdriver you need harder—not easier—to remove.
Use bins for small parts, not heavy tools
Pegboard bins are useful for drill bits, anchors, spare blades, and other items that otherwise collect in drawers. Look for a secure attachment and a front lip high enough to contain the parts. Very shallow cups are cheap but can spill when bumped. Keep heavy screws or metal parts in small quantities; a loaded bin places more strain on its attachment than an empty one.
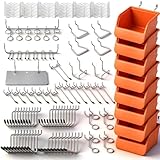
Assortment kits can be good value if you need several hook styles at once. Before buying, count the pieces you are likely to use and compare that with the kit contents. If most of the set is made up of long hooks while you need short ones for pliers and wrenches, the low price per piece is misleading. A pegboard accessory kit with hooks and bins makes sense for a bare board; for an established layout, buying only the missing holders usually costs less and creates less clutter.
Arrange tools to prevent common failures
Lay out the tools on a bench before installing accessories. Leave about 1 to 2 inches between handles where practical, and keep frequently used items at comfortable reach. Put heavy tools close to the panel and over well-supported areas. If a tool swings, add a second contact point or use a holder designed for that shape instead of simply choosing a longer hook.
Test each hook with the actual tool before filling the board. A tool should come off without dragging its neighbor or lifting the hook. If a hook repeatedly pulls free, check compatibility and orientation before trying to bend it; bent hooks can lose their fit, and bending does not fix loose or damaged pegboard holes. Replace a worn panel or mount a backing board if the holes have enlarged.
When to buy, and where to save
Accessory prices often dip around major sale periods and during spring workshop or home-improvement promotions. Kits can be discounted then, but compare the actual contents rather than relying on a claimed piece count. Shipping can erase the savings on a small order, so buying a basic assortment and a few specialty holders together may be better value.
Save on plain hooks for light tools and on simple bins for low-risk storage. Pay more when a locking design prevents repeated hook pullout, when a holder fits a tool you use daily, or when a loaded bin needs a secure attachment. There is little benefit in buying premium accessories for every item: the goal is a stable, usable layout, not a board filled with hardware.