Best Affordable Brake Bleeder Kit for DIY Car Maintenance
What's inside
As an Amazon Associate I earn from qualifying purchases. This post may contain affiliate links at no extra cost to you.
Bleeding brakes is one of the cheaper maintenance jobs you can do at home, but the wrong bleeder kit can turn it into a slow, messy afternoon. The best affordable setup depends on whether you have a helper, access to compressed air, or several cars to maintain. For most DIY owners, a hand-operated vacuum pump or a pressure bleeder offers the best balance of price, control, and repeatability.
As an Amazon Associate we earn from qualifying purchases at no extra cost to you.


What to buy for occasional brake work
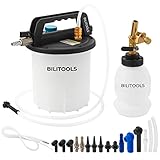
A basic hand vacuum brake bleeder kit is usually the lowest-cost useful option. These kits commonly include a hand pump, short hoses, a collection bottle, and adapters for common bleeder screws. Expect to pay about $20 to $35. They work without an air compressor and can also test vacuum-operated components.
The trade-off is that vacuum bleeding can pull air past the threads of the bleeder screw. You may see a steady stream of bubbles even when the brake system itself is fine. Wrapping the screw threads with a small amount of thread-sealing tape can reduce this, but keep tape away from the opening and never use it on the tapered sealing surface.
A pressure brake bleeder kit is often easier for one-person bleeding. It applies low pressure at the master-cylinder reservoir and pushes fresh fluid through the lines. Budget versions generally cost $40 to $80, while better kits with stronger tanks and more vehicle-specific caps can cost $100 or more. They are cleaner and faster, but the cap must seal correctly on your reservoir.
| Kit type | Typical price | Best use | Main drawback |
|---|---|---|---|
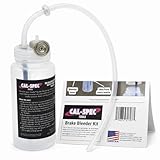
| Clear hose and bottle | $5–$15 | Two-person bleeding and very occasional work | Needs a helper; easy to introduce air if the hose slips |
| Hand vacuum pump | $20–$35 | Low-cost one-person jobs and diagnosis | Can draw air around bleeder threads |
| Pressure bleeder | $40–$80 | Fast, consistent one-person bleeding | Requires a reliable reservoir adapter |
| Air-powered vacuum bleeder | $30–$70 | Frequent work with an air compressor | Noisy and wasteful of compressed air |
The best value for most DIY owners
If you bleed brakes once or twice a year, buy a hand vacuum kit with a reasonably sized collection bottle, several hose diameters, and a replacement seal kit. A bottle holding at least 8 ounces is practical; a 16-ounce bottle is better if you are flushing all four corners. Clear hose matters more than a large selection of questionable plastic adapters because you need to see fluid color and bubbles.
For regular maintenance on multiple vehicles, a pressure bleeder is worth the extra money. It keeps the master-cylinder reservoir topped up while you work and avoids repeated pedal pumping. Look for a tank of at least 1 liter, a gauge that is easy to read, and a cap that is sold separately or supported by replacement parts. A universal cap can be convenient, but a poor seal wastes fluid and creates a false impression that the brakes are full of air.
An air-powered brake bleeder makes sense only if you already own a compressor. It can empty a caliper quickly, but a small pancake compressor may cycle constantly. That is not usually a problem for one car, but it makes the tool less attractive if buying a compressor solely for brake bleeding.
How to bleed brakes without creating new problems
Use the vehicle manufacturer’s bleeding order when available. Many cars are bled from the wheel farthest from the master cylinder toward the closest, but some diagonal or electronically controlled systems use a different order. Work on level, securely supported ground, remove as much old fluid from the reservoir as practical without exposing the ports, and refill with the specified DOT fluid.
Do not mix DOT 5 silicone fluid with DOT 3, DOT 4, or DOT 5.1 glycol fluid. DOT 3 and DOT 4 are commonly interchangeable only when the vehicle manufacturer permits it. Brake fluid damages paint, so cover fenders and rinse spills immediately with water.
With a vacuum kit, push the clear hose firmly over the bleeder nipple and keep the hose end below the fluid level in the bottle. Open the screw about one-quarter turn. Pump slowly, watching the reservoir constantly. Do not let it fall below the minimum mark, because that introduces air into the master cylinder and forces you to start over.
With a pressure bleeder, start around 10 to 15 psi unless the kit or vehicle instructions specify otherwise. Higher pressure does not necessarily bleed faster and can force fluid past a weak cap seal. Check every connection before opening a bleeder screw. When clean fluid with no bubbles appears, close the screw before releasing pressure.
Common failure modes and useful upgrades
A bleeder screw that will not turn is not a reason to apply extreme force. Use a correctly sized six-point wrench, penetrating oil, and gentle heat only where safe and appropriate. Rounded screws may need replacement. If the screw snaps, the caliper or wheel cylinder may require removal.
Soft brakes after bleeding can indicate trapped air, a leaking hose or caliper, a failing master cylinder, or incorrectly adjusted rear drum brakes. Pumping the pedal repeatedly is not a fix. If the pedal slowly sinks under steady pressure, stop driving and inspect the system.
Spend a few extra dollars on a sturdy wrench, a fresh length of tight-fitting clear hose, and a catch bottle that cannot tip over. A fresh container of DOT 4 brake fluid is also better value than trying to save an opened bottle that has absorbed moisture. Brake fluid is hygroscopic; once opened, store it tightly sealed and replace it rather than keeping it for years.
When seasonal discounts matter
Brake bleeder kits are commonly discounted during spring automotive-maintenance promotions, summer travel sales, and major November shopping events. The discount is worthwhile when it applies to a pressure bleeder with a supported cap system, not merely a kit with more adapters. Compare the final price, included cap, hose quality, and replacement-part availability.
For a single brake-fluid flush, a $25 hand pump is usually enough. For frequent work, a $50 to $80 pressure bleeder saves time and reduces mess. The cheapest kit is only a bargain if its hose seals, its bottle stays upright, and you can still control the job safely.