Best Affordable Cabinet Clamps for Face-Frame Assembly
What's inside
As an Amazon Associate I earn from qualifying purchases. This post may contain affiliate links at no extra cost to you.
Face-frame assembly does not require a shop full of expensive specialty clamps. The right budget setup keeps the stiles and rails flush, closes small gaps, and stays out of the way while glue sets. The wrong setup can bow a frame, leave clamp marks, or allow the joints to creep before you drive screws or brads.
For most small cabinet projects, a combination of face-frame clamps and a few ordinary bar clamps is the best value. Spend more only when you build cabinets regularly, work with wide frames, or need repeatable alignment across many assemblies.
As an Amazon Associate we earn from qualifying purchases at no extra cost to you.


What Makes a Good Face-Frame Clamp
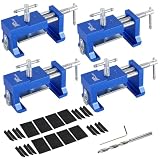
A useful face-frame clamp does two jobs: it pulls adjoining parts together and keeps their front faces in the same plane. Basic bar clamps often handle the first job but not the second. Their jaws can push one board higher than the other, especially when the stock is not perfectly flat.
Look for a clamp with a jaw or pad that bears across both pieces of the joint. A throat depth around 2 to 3 inches is adequate for most 3/4-inch face-frame stock. A clamp that applies pressure through the face of the frame is more useful than one that only squeezes the outside edges.
Pressure matters, but extreme pressure is not automatically better. A typical face-frame joint needs enough force to close the seam and hold it while glue spreads—often less than 100 pounds of practical clamping force. Excessive force can bow long rails, squeeze nearly all the glue out of the joint, or shift a miter before it sets.
Best Budget Clamp Types
| Clamp type | Typical price range | Best use | Main drawback |
|---|---|---|---|
| Specialty face-frame clamp | $20–$45 each | Flush alignment at rail-and-stile joints | Limited to cabinet-style work |
| Quick-grip bar clamp | $10–$25 each | Light assembly and temporary positioning | Lower pressure; can flex or slip |
| Parallel-jaw clamp | $25–$60 each | Long rails and accurate 90-degree assemblies | Heavier and more expensive |
| Pipe or F-style clamp | $12–$30 each | General shop clamping and wide frames | Needs pads or cauls to prevent misalignment |
For a first purchase, compare face-frame cabinet clamps rather than buying a large assortment. Two specialty clamps can make a small frame much easier to assemble than six ordinary squeeze clamps.
The Best-Value Shopping Strategy
Buy two clamps first if you are building one or two cabinets. Use them at the active joint, then move them as you work around the frame. Add a third or fourth clamp when the frames become wider than about 30 inches or when you need to glue several joints at once.
A practical budget kit is two specialty face-frame clamps, two 12-inch bar clamps, and two 24-inch clamps. That usually covers drawer-base and wall-cabinet face frames without tying up a large amount of money. If you already own bar clamps, buy only the specialty clamps and use the existing tools for backup pressure.
For occasional repairs, inexpensive quick-grip clamps are fine. They are fast to position and gentle on finished surfaces. Their weakness is that the trigger mechanism may not hold high pressure reliably. If the joint opens when you release the handle, the clamp is better treated as a positioning tool than a structural assembly clamp.
For repeated cabinet work, 24-inch parallel-jaw clamps offer better long-term value. They cost more, but their broad jaws keep rails and stiles aligned over a larger area. They are also useful for carcass assembly, panel glue-ups, and installing cabinet backs.
How to Clamp a Face Frame Correctly
Dry-fit the frame on a flat surface before applying glue. Check the diagonals: measure from one corner to the opposite corner in both directions. If the measurements differ by more than about 1/16 inch on a small frame, correct the layout before clamping.
Apply a thin, continuous glue film to the mating edge. Too much glue creates hydraulic pressure and makes the parts slide; too little leaves dry spots. Position the rails and stiles, then install the face-frame clamp so its pads sit squarely on the stock rather than on a rounded edge.
Use moderate pressure and check the front surface with your fingertips. The joint should feel flush, not stepped. A small difference of 1/32 inch can remain visible after paint, and it becomes especially noticeable under clear finish. If one part rises as you tighten, loosen the clamp, realign the boards, and add a caul instead of simply applying more force.
For long rails, place clamps roughly every 12 to 18 inches. Put one close to each end, but not directly over a weak or unsupported corner. A clamp positioned too far from the joint may bow the rail without closing the seam.
Common Failure Modes and Fixes
Clamp marks: Metal jaws and narrow pads can dent soft pine, poplar, and painted stock. Use cork, leather, or thin plywood pads. Waxed paper between the pad and the frame also prevents dried glue from bonding to the clamp.
Joint creep: Smooth, glue-coated edges can slide under pressure. Add a few pin nails, pocket screws, or a temporary stop block. If using pocket screws, clamp the joint firmly because the screw can pull one piece out of alignment as it enters.
Out-of-square frames: Clamps alone do not guarantee square. Measure diagonals after every major adjustment. A simple corner square or a temporary plywood jig is often more effective than buying stronger clamps.
Over-tightening: If the frame bows or the glue line becomes visibly starved, back off. The goal is contact, not maximum force. Clean squeeze-out after the glue becomes rubbery but before it fully hardens.
When to Spend More
Upgrade when the clamps slip, flex, or require repeated repositioning. A better clamp is worthwhile if it saves five minutes on every joint across dozens of cabinets. It is less worthwhile for a single bathroom vanity.
Seasonal sales are most useful around major holiday promotions and end-of-year tool clearances. Compare the price per clamp, not just the package price: a four-pack may include shorter clamps that are useless for your frames. Also check replacement pads and warranty terms. A budget clamp with replaceable pads can outlast a slightly cheaper tool that must be discarded after one damaged jaw.
For the occasional DIY cabinet, start with 12-inch quick-grip bar clamps and add two specialty clamps if alignment is difficult. For a cabinet shop or frequent remodeler, choose parallel-jaw clamps and a dedicated assembly jig. The cheapest workable setup is usually the best buy—as long as it holds the frame flush, square, and undamaged.