Best Value Tools for Installing a Basic Garage Wall Storage System
What's inside
As an Amazon Associate I earn from qualifying purchases. This post may contain affiliate links at no extra cost to you.
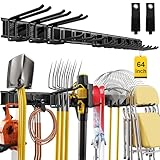
A basic garage wall storage system usually needs a few sturdy shelves or rails, the right fasteners, and tools for locating studs and drilling clean holes. You can do the job with a modest kit; paying for premium versions of every tool rarely improves the result. The important exception is fastening: a cheap drill bit or poorly chosen anchor can turn a straightforward installation into a loose, unsafe one.
As an Amazon Associate we earn from qualifying purchases at no extra cost to you.


What the job requires
For a typical system attached to wood-framed walls, plan on a stud finder, tape measure, level, drill or driver, and bits matched to the hardware. A 12-volt drill can handle most pilot holes and screws in pine studs. An 18- or 20-volt drill is useful if you already own one or expect to drive many large screws, but it is not a must-buy for a single wall.
Before shopping, check the storage system’s installation instructions. Some rails require a specific screw diameter or spacing; shelf brackets may need larger structural screws. Drywall anchors are not a substitute for fastening a loaded rail into studs. If the wall is masonry, the fasteners and drill bits change substantially, so do not buy a wood-framing setup until you know what you are drilling into.
Best-value tool picks
A basic 12-volt drill-driver kit is a sensible buy if you have no drill. For a handful of pilot holes and screws, it is lighter and often cheaper than a full-size kit. Choose a kit that includes two batteries if the price difference is small, but a single battery is fine for this job. A new homeowner who expects regular projects may get better long-term value from an 18- or 20-volt platform, especially if it shares batteries with tools already owned.
For measuring and layout, a 16-foot tape is enough for most garage walls. A basic 24-inch level works for short rails and shelves; a longer level helps align a run across multiple studs. A cheap torpedo level is acceptable for checking a small bracket, but it is awkward for a long horizontal rail. If your wall is uneven, verify the rail at several points rather than trusting a single reading.
A basic electronic stud finder is convenient, but it can give false readings around pipes, wiring, insulation, or patched drywall. A strong magnet is a cheap alternative for locating drywall screws, which often mark stud positions. Confirm the suspected stud with a small pilot hole in a spot the rail will cover. This takes longer but can save a wasted hole or a missed fastener.
What to buy for the job
| Tool or supply | Budget choice | When spending more helps |
|---|---|---|
| Drill-driver | Basic 12-volt kit, roughly $60–$120 | Choose 18/20 volts for frequent use or large screws |
| Stud locating | Magnet, roughly $5–$15 | A stud finder is faster across a long wall or several projects |
| Level | 24-inch level, roughly $10–$25 | A longer level helps align long rails and shelves |
| Driver bits | Small impact-rated bit set, roughly $10–$25 | Better bits are less likely to cam out on repeated screws |
| Fasteners | Use the storage maker’s specified screws | Do not economize by substituting drywall screws |
These are typical U.S. street-price ranges, not guaranteed sale prices. Batteries, included accessories, and brand promotions can make two kits with similar tool specs differ by $30 or more. Compare what is in the box and the cost of a replacement battery, not just the tool’s advertised price.
Where not to cut corners
Buy a small set of impact-rated driver bits that matches the screw heads in your hardware. The wrong bit slips, chews up the head, and can make a screw difficult to remove. A large mixed bit kit is unnecessary unless you have other projects in mind. Keep a spare of the most-used bit; inexpensive bits can wear quickly, especially when driven at high speed.
Use the structural screws specified by the storage-system maker, or an approved equivalent of the stated diameter and length. Ordinary drywall screws are brittle and are not designed to support this kind of load. A pilot hole that is too small makes driving difficult and can split a stud; one that is too large reduces bite. Check the screw instructions for the recommended pilot size, and stop if the screw spins without tightening.
Locate wiring and plumbing before drilling. Do not drill directly above or below outlets without checking what may be routed through the stud bay. Wear eye protection, clear the floor of cords, and support long rails while fastening them. Load shelves gradually and stay within the system’s stated capacity; a tool rating assumes correct installation, not merely a strong-looking bracket.
Brand value and buying timing
For occasional home use, the least expensive reputable kit is often adequate. Mid-priced brands can be worth the difference when they offer a broad battery platform, available replacement batteries, and local service. Premium tools make more sense for frequent work, heavy drilling, or a collection of compatible cordless tools. For a one-time garage project, buying into an expensive platform just for a drill is poor value.
Consider a cordless drill kit on sale rather than chasing a particular badge. Holiday promotions and spring home-improvement sales often bundle a second battery or another tool at little extra cost. Check the kit’s actual contents: a “bare tool” has no battery or charger, and a low headline price can be misleading if you need both. For this installation, do not pay extra for hammer mode unless you also need to drill masonry.
A cost-conscious installation plan
Lay out the rail or bracket positions first, then mark the stud centers and check them with a second method. Level the rail, mark the fastener holes, and drill pilot holes into the studs. Drive screws snugly without over-tightening; stop if a head begins to strip or the rail bows against an uneven wall. Add shelves or hooks only after the rail is secure, then test the system with light loads before storing heavier items.
If you already own a drill, tape, and level, your only purchase may be the correct bit or fasteners. If you need everything, a practical starter setup can land around $100–$180 before the storage system itself. Spend first on compatible fasteners and a drill that will remain useful; skip specialty accessories until the installation shows you a real need.