Best Value Laser Level for DIY Flooring and Wall Projects
What's inside
As an Amazon Associate I earn from qualifying purchases. This post may contain affiliate links at no extra cost to you.
A good laser level can save more time than a premium flooring tool, but DIY buyers do not always need a $100-plus professional unit. For flooring layout, cabinet lines, backsplash work, and wall projects, the best value is usually a self-leveling cross-line laser with a visible horizontal and vertical beam. Spend more only when you need a brighter beam, a wider working range, or better protection against job-site abuse.
As an Amazon Associate we earn from qualifying purchases at no extra cost to you.


The best value specification
For most indoor projects, look for a self-leveling cross-line laser with an accuracy rating around 1/8 inch at 30 feet or better. That is plenty for laying out tile, checking cabinet heights, setting chair rails, and transferring a reference line around a room. A unit rated at 1/16 inch at 30 feet is more precise, but the difference will not usually be visible in a small bathroom or bedroom.
Self-leveling matters more than extreme accuracy. A manual bubble-level laser can project a line, but it is easy to set slightly crooked and carry that error across an entire wall. A self-leveling model corrects small setup errors, commonly within about 3 to 4 degrees. If it is outside that range, it should flash or stop instead of projecting a misleading line.
For a typical indoor remodel, compare self-leveling cross-line laser levels rather than single-line models. The horizontal beam helps with flooring and trim; the vertical beam is useful for tile edges, partition walls, cabinets, and aligning fixtures.
Budget, midrange, and premium value
| Type | Typical street price | Best use | Main compromise |
|---|---|---|---|
| Basic red cross-line laser | $25–$60 | Small rooms, trim, shelves, backsplash layout | Dimmer beam and shorter useful range |
| Better red cross-line laser | $60–$120 | Most flooring and wall projects | Usually lacks a detector and advanced mounting |
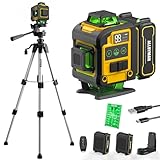
| Green cross-line laser | $80–$180 | Bright rooms and longer indoor distances | Higher price and faster battery drain |
| Multi-plane or 360-degree laser | $150–$350 | Whole-room layouts and repeated elevations | Overkill for one-off flooring jobs |
The $40 to $80 range is the value sweet spot. A cheap red laser is fine when you are working within 15 or 20 feet, controlling the room lighting, and checking the line with a ruler. A midrange unit is easier to see, tends to have a more useful pendulum lock, and often includes a tripod thread and a basic wall bracket.
Green beams are noticeably easier to see in daylight or on pale walls. They are not automatically more accurate. Buy green when the room has strong windows, when you routinely work more than 20 or 30 feet from the laser, or when your eyesight makes a red beam difficult to follow. Otherwise, a red model can save $30 to $80 without reducing the quality of the finished work.
Using a laser for flooring
A laser does not replace a floor inspection. Before installing laminate, vinyl plank, or tile, check flatness with a long straightedge. Many flooring manufacturers allow no more than about 3/16 inch of variation over 10 feet, though the exact requirement depends on the product. A perfectly level floor is not always necessary; a flat floor is. A laser only tells you where a line or plane is located.
For a floating floor, use the horizontal line to establish a reference around the room, then measure down to the finished-floor height. Do not assume the line itself should be at the top of the flooring. Account for underlayment, adhesive, tile thickness, and transitions. Mark several points with a pencil or painter’s tape rather than relying on the beam while cutting.
For tile, snap or mark a layout line based on the room’s visual center and the actual tile pattern. Starting from a laser line that is square to one wall can produce narrow slivers at the opposite wall if the room is out of square. Dry-lay enough tile to expose that problem before spreading mortar.
Wall and cabinet projects
Use the vertical beam to transfer a cabinet edge, partition location, or tile boundary from floor to ceiling. For a level shelf or row of wall cabinets, project the horizontal beam and measure from it to the mounting points. This is faster than repeatedly checking a short spirit level, especially across a long wall.
Laser levels have predictable failure modes. A line can look level even when the tool is sitting on a soft surface or a tilted tripod. Let the pendulum settle for several seconds, and check the line against a known reference by rotating the laser 180 degrees in the same location. If the line shifts substantially, the tool may be inaccurate or damaged.
Bright sunlight can wash out a red beam. Close blinds, work later in the day, or use a target card. Avoid measuring the fuzzy outer glow; use the center of the sharpest line. On textured drywall, the beam may appear broken. That is a visibility problem, not necessarily an accuracy problem.
Features worth paying for
A magnetic wall mount is more useful than a padded case for many DIY projects. A 1/4-inch tripod thread is also valuable, but budget mounts can slip on painted drywall. Look for a lockable pendulum if you need to project angled lines for stairs or decorative work. Without the lock, the laser may flash because it is intentionally out of level.
A detector is worthwhile mainly for outdoor work or long distances. Most inexpensive indoor lasers are not designed to remain visible in full sun, and a detector can add $30 to $80. Do not pay for one if your projects are limited to indoor floors, walls, and cabinets.
Battery type affects value. Standard AA or AAA batteries are cheap and easy to replace. Rechargeable USB models reduce ongoing cost but can leave you waiting if the battery is empty. Check claimed runtime with the laser continuously on; intermittent-use estimates can be misleading.
When and how to buy
Prices often dip during major tool promotions in spring, Father’s Day sales, October holiday events, and Black Friday. The best deal is not always the lowest sticker price: compare the package contents, warranty, wall mount, batteries, and return policy. A $45 laser without a mount may cost more to use than a $60 kit that includes one.
If you only have one flooring job, buy a basic or midrange red cross-line laser and spend the difference on a straightedge, quality tape measure, and layout chalk. If you expect repeated remodels, work in bright rooms, or install cabinets across large spaces, a green-beam self-leveling laser is the more comfortable long-term choice. For a single small room, the cheaper red option is usually enough.
Before checkout, confirm the accuracy rating, self-leveling range, beam configuration, mounting thread, battery type, and warranty. Those details affect the finished layout far more than a rugged-looking case or a long list of accessories.