Best Value Tools for Replacing a Short Run of Baseboard
What's inside
As an Amazon Associate I earn from qualifying purchases. This post may contain affiliate links at no extra cost to you.
Replacing a short run of baseboard is a small job, so buying a full contractor-grade tool kit rarely makes sense. The right value comes from matching the tools to the cut count, the room and whether you expect to use them again. For one straight wall, a hand saw and a simple miter box may be enough. For several corners, a rented or borrowed power miter saw can save time and improve repeatability.
As an Amazon Associate we earn from qualifying purchases at no extra cost to you.


Measure the job before buying
Measure the wall, then add material for test cuts and mistakes. For a short run of about 8 to 12 feet, one extra foot of baseboard is a sensible minimum; add more if the wall has several corners or the profile is difficult to match. Bring a cutoff of the old baseboard to the store if you need to match its height, thickness and shape. A close but not exact profile can leave a visible mismatch where the new piece meets the old.
Also check whether the wall ends at square corners, outside corners or door casing. Inside corners are often coped rather than joined with two matching miter cuts, especially when walls are not square. That takes more hand-tool skill but can produce a tighter joint as the wood moves. If you are replacing only one damaged section, spend time matching the existing profile and paint sheen; those details can be more noticeable than a slightly imperfect cut.
Choose tools by cut count
| Setup | Typical cost range | Best for | Main trade-off |
|---|---|---|---|
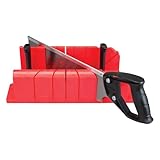
| Fine-tooth hand saw and miter box | $15–$40 | A few simple cuts and occasional home repairs | Slower; cheap boxes can flex or give slightly inaccurate angles |
| Borrowed or rented miter saw | Often $0–$60, depending on access and rental terms | Several corners or repeated cuts | Requires transport, setup and safe handling |
| Entry-level corded miter saw | Roughly $100–$200 | Regular trim projects where storage is available | More cost and space than one short run justifies |
Prices vary by retailer, region and sale timing, so treat these as planning ranges rather than current quotes. A fine-tooth backsaw and miter box are the lowest-cost setup that can make clean cuts in common wood or MDF trim. Choose a box that holds the saw securely and has a slot for 45-degree cuts. A loose, lightweight plastic box can wander as you push the saw, leaving an angled face that will show at the joint.
For two or three cuts, hand tools are not automatically a compromise. They are quiet, easy to store and do not require a power outlet. Use a sharp saw, clamp the box to a stable surface and cut slowly. If the trim is tall, make sure the box supports it upright; tilting the piece changes the cut. Practice on a scrap first, and keep the finished face from chipping by placing painter’s tape over the cut line or orienting the saw so its teeth cut the finished face cleanly.
When a miter saw is worth it
A miter saw makes sense when you have many corners, a second trim project coming up or someone who can lend you one. For a single short run, renting or borrowing usually beats buying: a saw priced at $150 has little value if it sits unused after six cuts. If you do buy, a basic corded saw is often better value than a battery model for occasional stationary work. Battery platforms add cost unless you already own compatible batteries and expect to use the tool elsewhere.
Do not pay extra for a sliding saw just to cut ordinary baseboard. A standard saw can handle many trim widths, but check its stated crosscut capacity against the actual height of your baseboard standing in the cutting position. A wider piece may need to be laid flat, which changes how you set the bevel and support the stock. A corded compound miter saw is a sensible buy for repeat trim work; for one room, a rental is usually better value.
Power saws also create more opportunities for a bad cut. Check the angle on scrap before cutting the finished piece, keep the trim firmly against the fence and support long stock so it cannot tip. Wear eye and hearing protection, and wait for the blade to stop before lifting it. A cut that is off by even one degree can leave a noticeable gap across a miter.
Nails, glue and finishing
For a short run, a hammer and finish nails can be cheaper than buying a nailer. Use nails long enough to pass through the baseboard and enter the framing, typically around 1½ to 2 inches depending on trim thickness and wall construction. Find studs where possible. If the wall is plaster, masonry or the studs do not line up with the fastening points, the right fastener may differ; do not expect caulk to hold a loose board in place.
A brad nailer can speed the job, but buying one only for a few feet of trim is hard to justify. Borrow one if available. A small pack of finish nails is inexpensive and avoids a tool purchase, though hand-nailing takes care near the board’s edge. Drill a small pilot hole if the wood splits, especially close to an end. Set nail heads below the surface, fill the holes, then caulk only the top edge and small wall gaps. Caulk will not disguise a badly fitted corner.
Before shopping, check whether you already own a tape measure, pencil, hammer, utility knife and putty knife. Those are enough for many short replacements. Put the budget toward a sharp saw or a better-matched piece of baseboard rather than duplicate accessories. If the trim needs painting, price primer and paint too; replacing a short run can still look patchy if the new section has a different sheen or color.
Best-value buying plan
For one straight replacement with no complicated corners, buy or borrow a fine-tooth hand saw, use a stable miter box and fasten the trim with finish nails. For several inside and outside corners, borrow or rent a miter saw if possible, then return it once the cuts are done. Buy a basic corded saw only if you can name likely future jobs and have room to store it. That approach keeps the tool bill proportionate to the work—and leaves enough budget to avoid skimping on accurate measurement, a test cut and a close match to the existing profile.