Best Budget Tools for Repairing Loose Deck Railings
What's inside
As an Amazon Associate I earn from qualifying purchases. This post may contain affiliate links at no extra cost to you.
Check the rail before buying tools
A loose deck railing is often a fastener problem, but not always. Push gently on the rail and watch where it moves: the post at the deck, the rail-to-post joint, or the balusters between rails. A post that rocks at its base needs a different repair from a loose screw in a handrail bracket. If the wood is soft, split through, badly rotted, or pulling away from the house, stop and fix the damaged structure rather than adding longer screws.
Check the other posts and the framing below the deck, too. A sound-looking surface board can hide a weak connection underneath. Don’t rely on a railing that moves while you work, and keep people off the deck until the repair is secure. Local codes may specify railing height, openings, and how posts must be attached; a quick fastener repair won’t correct a railing that was poorly built in the first place.
As an Amazon Associate we earn from qualifying purchases at no extra cost to you.



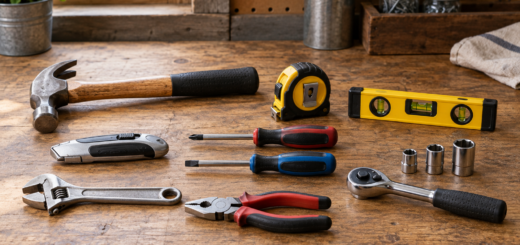
A budget tool kit that covers most repairs
For a simple tightening job, a cordless drill/driver, the correct driver bit, a tape measure, and a small level may be all you need. A basic 12-volt drill is usually adequate for driving a few structural screws into sound framing. An 18- or 20-volt drill gives more reserve for larger fasteners and other home projects, but costs more and can be heavier. Buy a drill with a clutch; set it low enough that you don’t strip a screw head or crush the wood.
Use exterior-rated structural screws for wood-to-wood connections where the repair design allows them. Ordinary drywall screws are brittle and are not a substitute for structural fasteners. For a connection that needs a through-bolt, use a wrench or socket set and washers, not a longer screw chosen by guesswork. Fasteners and connectors should suit the lumber and exposure; some treated wood can corrode incompatible metal.
A tape measure and level are inexpensive and useful, but don’t expect a small level to prove that a post is structurally sound. A pencil, safety glasses, and a bit set are also worth having. If your drill kit lacks the needed bit, buying a single compatible bit is usually better value than purchasing a large set you won’t use.
For a first drill/driver, compare battery cost as well as the tool price. A bare tool may look like a bargain but requires a compatible battery and charger. If you already own batteries from a brand’s cordless platform, a bare tool from that same platform can be the cheaper choice. For occasional deck work, a corded drill can cost less and avoid battery aging, but the cord is awkward outdoors and requires a suitable power source.
Compare the cost by repair, not just by tool
Prices vary by store, kit contents, and sales. The ranges below are typical planning estimates, not quotes; check current listings and make sure the fasteners suit your connection. Spending on a more powerful drill won’t compensate for damaged framing or the wrong fastener.
| Tool or supply | Typical budget range | Best value when | Main trade-off |
|---|---|---|---|
| Basic 12V drill/driver kit | $60–$120 | You need to drive a modest number of screws | Less reserve for large fasteners or long sessions |
| 18V/20V drill/driver kit | $100–$200 | You’ll use the tool for other repairs, too | Higher kit and replacement-battery cost |
| Corded drill | $40–$100 | You work near power and want low upfront cost | Cord management and outdoor power needs |
| Structural screws or compatible bolts | $10–$35 | The existing wood and joint can accept a proper fastener | Wrong length or placement can miss framing or split wood |
| Basic socket or wrench set | $15–$40 | The repair uses through-bolts and nuts | Cheap sets may omit the size you need |
Choose a drill without overbuying
For occasional maintenance, a basic 12V cordless drill/driver kit is enough for pilot holes and ordinary screw driving in sound lumber. It is the economical choice if you don’t already need a higher-voltage battery platform. Don’t force a small drill through dense wood with a large fastener: drill a suitable pilot hole where the fastener manufacturer recommends one, keep the bit straight, and let the tool work rather than leaning hard on it.
If you already have batteries or expect to tackle repeated repairs, an 18V or 20V drill/driver kit can be better long-term value. Brand loyalty makes financial sense when it prevents buying another battery and charger. It matters less if this is a one-time job and a reliable lower-cost kit includes everything you need. Avoid paying extra for a hammer-drill function unless you have a separate masonry task; it does not make a deck-rail connection stronger.
Buy the fastener for the joint
For a post that is loose at the deck, first determine whether it is attached to a rim joist, blocking, or another sound structural member. A screw driven only into a thin deck board may tighten temporarily and then loosen again. A structural screw needs enough embedment in the intended framing, but it should not be so long that it exits the far side or hits something hidden. Follow the fastener maker’s guidance on diameter, length, spacing, and pilot holes.
Where the connection calls for a through-bolt, use a bolt, nut, and washers of suitable size and material, and check that the post and framing are not crushed or split. Do not overtighten until the washer sinks into the wood. If the wood is cracked at the bolt holes, or the post still moves after tightening, adding another fastener may make the damage worse.
Common low-cost mistakes include reusing stripped screws, driving a fastener at an angle, fastening into rot, and tightening a handrail joint without checking the post below it. A drill’s clutch can prevent some damage, but it cannot tell you whether the screw reached framing. Stop if the bit keeps slipping, the wood starts splitting, or a post shifts under light hand pressure.
When to buy, and when to call for help
For a project you can schedule, compare prices during major spring and holiday tool promotions, but check what is actually included. A discounted bare tool is not a bargain if you need a battery and charger; a larger kit is poor value if you’ll never use the extra tools. Buying fasteners by the small pack costs more per screw, yet avoids leftover specialty hardware that may not suit another repair.
Choose a professional inspection if multiple posts move, the deck framing is damaged or inaccessible, the railing is attached to masonry or a house wall, or the repair involves an elevated deck and you’re unsure how the loads are carried. A loose rail is a fall hazard, not just a nuisance. The best budget is the tool and fastener combination that fixes the actual connection without hiding structural damage.